For those who sail Ensigns, it’s important to check the bilge and ensure 1) that you aren’t carrying a ton of water down there, and 2) that the bilge pump on the boat works.
The club has electric bilge pumps over in the dock box on the eastern most side (across from the sign-in box. Those allow for a quick pump-out in the event it’s rained and there is a lot of water down in the bilge.
Each Ensign has its own manual bilge pump at the rear of the boat underneath where the tiller connects. Before leaving the dock, it’s important to check the bilge and ensure the manual pump is in operating condition. Note – it make take 4-5 strokes until the pump is primed and starting to pump water out the discharge hose that you hang over the side of the boat. So, if it doesn’t come out on the first couple of strokes, don’t dismay but instead keep at it.
The pumps do fail now and then. They typically will last for 24 months. The most recent rebuilds were done in November 2022. Failures are typically traced to either failure of the internal pump rubber bellows or smaller flap components, or to leaks/cracks in the hoses that connect to the pump since an airtight connection is needed to generate the vacuum effect necessary to pump water out.
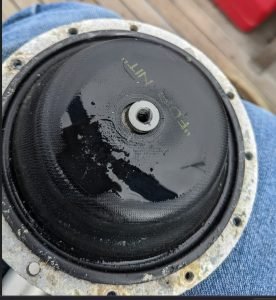
As you can see in the picture on the left below, cracks in the bellows are a common source of failure, with air leaks causing the vacuum to be too weak for water to be pumped out.
Another source of failure is debris and clogging. When you go to use the pump, if it seems like it has a lot of back-pressure in the system as you try to pump it, the intake might be clogged. In the picture at the right below, you’ll see the debris I recently removed from one of the Ensigns. Build-up of trash and other materials that fall into the bilge can block the intake hose entrance and thus make it difficult to pump out.
Here are step-by-step instructions for Ensign boat captains or others who may wish to perform repairs in the future. I performed bilge pump repairs for the two past repair cycles, in the Fall of 2020 and again in the Fall of 2022. The repairs are rather simple but do require patience. There are many small screws, so bringing along a small tray or can, into which the screws and nuts can be put is key to avoiding the predicament of dropping them into the bilge. Additionally, the pumps are old and made out of plastic, so one must use care to gently tighten the screws – make them snug but not overtightened – the point being to avoid cracking the plastic housing which might render it unusable or prone to air leaks.
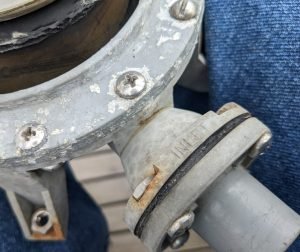
The pump can be detached from the mounting location by unscrewing the four screws that secure it to the underside of the deck near the tiller attachment. NOTE: Be careful to catch the nuts as you un-tighten and remove the screws. Once the four screws are removed, the pump will fall down a bit but is still suspended in air due to the connection to the intake hose. Please use a screwdriver to loosen the metal ring and then wiggle the hose left and right until you gently work it off from the pump assembly. At that point, the pump will fall into your hands as shown below on the left. You can now also loosen the metal ring on the output side and remove that hose as well.
To the right below you’ll see the parts kit – these are available at Downwind Marine, although I do keep a spare kit on hand in the Repairs dockbox (middle dockbox that our club uses).
NOTE: Before disassembly, it is important to note the position of the handle or the body relative to the intake and discharge. Using a Sharpie or piece of tape to mark the original position will help later once the unit is to be re-assembled, so that the handle is in the right position for installation and will be in the right position post-install for pumping use.
In order to secure the upper and lower bodies of the pump uniformly without leaks, the pump has about a dozen screws/nuts holding the two together. One should loosen the screws in a rotary crisscross fashion, similar to how one installs or de-installs lug nuts on a wheel, alternating side to side until all are loosened. Here’s a word about that:
Once all the screws and nuts are loosened and put aside in a can or tray, you can lift the two body pieces apart. Using a large flathead screw, unscrew the plastic holding plate, remove the old bellows, replace it with a new bellows, and re-assemble. NOTE: Be sure to snug up the big screw well, without over-tightening it. A loose connection here with result in leaks in the near future and the need to essentially do the entire pump removal and teardown process all over again in order to retighten this part.
You’ll notice that the bellows has a protrusion which fits into the groove of the other side of the pump upon re-assembly. It is important to position the bellows with this groove facing up, so that it then goes nicely into the groove when the two parts are put back together. It is also advised to take a small piece of cloth and to clean the inside of the groove prior to re-assembly so that it fits tightly and properly.
Reversing the dis-assembly process, using the crisscross pattern, each screw and nut must be inserted and gradually snugged up in a rotary fashion so as to attain uniform pressure on the seal of the pump in all areas once fully re-assembled with all screws/nuts in place. Remember that this is plastic, so use care to gradually tighten and snug up, without overtightening.
Once done, we can replace the flap valves. New flap valves for the intake and discharge sides of the pump are provided with the kit of parts. There are four screws which need to be removed. Upon removal, the intake section and the discharge section will each easily come apart, and it is important to do each one-at-a-time, and taking note of the flap position so that upon removal and attachment of the new flap valve, it is in the same position.
Wipe off and clean up all connections prior to attaching the new valve flaps. Be sure to snug up the 4 screws in a crisscross pattern, little by little, so that there is uniform pressure applied in all areas. The screws should be nice and snug, but not overtightened since the material is plastic.
At this point, the pump is ready for re-assembly underneath the deck near the tiller. However, before proceeding to that step, it would be wise to check the bilge. At then end of the hose coming from the bilge which connects to the intake, there is a filtering grill as shown below. It may be partially clogged already or could become more clogged unless debris in the bilge is removed. As shown below, it is important to manually remove whatever trash and debris are in the bilge, and to ensure the filtering grill is completely clean. One can remove the four screws and clean both sides if necessary, before re-assembling.
Once done, we take the pump and reconnect it to the hoses. The hoses fit tight, so it is advisable to bring a small bottle of dish soap, and to put a small dot on your finger and to rub it over the intake and discharge pieces before attaching the hose and tightening the metal ring. The soap will help the hose slide on and into position, but it still requires some back/forth action to properly secure the hoses to the pump. Once that is done and the metal rings are re-tightened, the final step is to simply re-attach the pump, to slide it up onto the screws protruding through the deck near the tiller, affixing the nuts and using a crisscross pattern to gradually tighten those 4 screws and to raise the pump up until it is securely attached with no gaps on the underside of the deck.
Now we can use the hose, fill the bilge with some clean water, and test the system to ensure it works and that there are no leaks.